Showing posts with label Best Websites for Teaching and Learning. Show all posts

Wednesday, October 30, 2013

Let The Gaming Begin!

Not being what one would call a gamer, knowing how easily it would be a rabbit hole from which I might never return (Remember, I lost a whole summer in the world of Myst), I have saved this next website from the American Association of School Librarians Best Websites for Teaching & Learning 2012.  Yes, I've waited an entire year.  The committee placed it under the heading of Media Sharing aligning it with the following Standards for the 21st-Century Learner:

  • 3.1.4 Use technology and other information tools to organize and display knowledge and understanding in ways that others can view, use, and assess.
  • 3.3.4 Create products that apply to authentic, real-world context.
Gamestar Mechanic is a free website for basic use.  According to the Privacy Policy your real name, address or phone number is not required for registration.  You will be asked your age to determine which portions of the site are available for your use. (Certain sharing and networking features, no live chat, is for those over the age of 13.)  Users under the age of 13 are not asked to provide email addresses.  If users are registered through an educator in the classroom their real name may be required. Here is an image of what is offered as explanation for parents.


When initially accessing the site, in the upper right-hand corner, you can log in, head over to the FAQ section or submit a written request via email for assistance.  It is important to note that Adobe Flash Player version 10 or later is needed for using this website.  The Sharing Games section (as do all the sections)  provides very complete information as to what is available.  You can recommend your game to another mechanic with their user name, a link to your game can be sent to an email address you list, you are given an URL link, an HTML code for embedding and buttons are provided for various social network sharing.


Moving down the page a video to learn more about the site is supplied.  Links with more information for teachers, parents and taking an online course are available.  You can register or log in in this section too.


Skipping ahead further before we begin, an explanation of what users can expect at the site is displayed.  You can play and learn, take courses, make your own games and join the community.  In the parents section this is simplified into play, design and share.


To start using the site I clicked on Get Started.  Enter in your user name, a password, birth date, check the box Gamestar Mechanic Terms of Service and select Register.  (At most screens you can get to the Parent and Help pages.)  At the new screen you are asked to choose your favorite subject, animal, color and activity in case you need to be reminded of your password.  They shuffle the choices at the next window to confirm your selections.


There are several choices at the next window.  The column on the far left represents the free use of this site.  According to the instructions you need to complete a certain amount of play in order to publish and showcase your games.


After choosing Get Started, the next screen gives you several options as shown in image one. Since it stated you need to complete episodes to publish and share I decided to choose Quest.  The second image represents the first page in the Quest.


A adventure story begins where the character of Addison (you) is revealed. In the first episode you have to play and beat four games. Each game has a series of levels.

To begin mouse over and click on Naviron Adventure. (It took me two tries to win the first level. I am definitely not a gamer.) When each mission (game) is completed, the next is unlocked.  You are rewarded with a sprite when you win.


The second level on mission two, Altair Journey, seemed to take forever.  The right combination was hard. It was a challenge in that I needed to not only jump from the bottom but from spire to spire.  Definite thinking and strategy are involved along with hand-eye coordination. 

By the third and fourth missions I was getting the hang of it.  They even threw in a rogue element to the story.  Episode 1 was completed.  (Whew!)

Four more episodes need to be finished.  Between each episode (game with levels) the story began in the introduction continues.  It's like you are in an animated comic.  The image below is after the story has continued.  It's a map of the factory showing I have completed episode one but the challenge of episode two is waiting for me. 

The second and third images show the new missions.  This time instead of player you are put in the position of being a designer.  Addison and company are in a bit of trouble.


In order to continue my exploration of the site I paused here to design a game.  To design a game select Workshop at the top of your screen.  (See image above.) The next window advises you of the rules of the site as well as your standing.  I clicked on Build A New Game!


You are now at the game creation window.  The four small icons on the right represent, top to bottom, move, edit, clone and erase.  They refer to items on the grid.

On the left the top setting is for your game name, game introduction message, game win message and goals and rules.  The other setting is for the level in which you are working.  At the bottom you can see there is a green light for save but not for publish.  It's red.  


To place avatars, enemies and blocks on the grid click on them and move them to a square on the grid.  If you want to use any of the tools on the right click on one, move it to the grid over the item and click.  To release it, move it back to the side and click.

Once you have the blocks, goal, avatar and enemies in place, click on play (top left) to see how the game you have designed works.  You can toggle back and forth between play and edit until you are satisfied.  When you successfully win the game you have created the publish button turns green.  You still can not publish it though, according to pop-up instructions, until your first quest is finished.  The image below is what my created game looks like.  


The next area I will cover in this post is the section for teachers.  At that page you can learn the basics of Gamestar Mechanic, access and view loads of lessons and videos from Gamestar Mechanic and other sources, connect with other educators on Edmodo, and follow a link to their blog. 


As an educator you can sign up your entire class for free or a premium package is available.  The cost is $2.00 per student.  This image shows a portion of the information you need to provide to sign up your class for either account.


After having spent hours at this site, I can readily understand why it was placed on the Best Websites for Teaching & Learning by the AASL committee.  Students are actively engaged in learning and creating.  I highly recommend this site.  Now back to episode two.  I need to get Addison out of the elevator.

Wednesday, October 9, 2013

Virtual Post-It Boards-Pinterest

Having read a post by Kelly Tenkely at iLearn Technology, I received an invitation to begin using Pinterest more than a year ago.  To date I've been hesitant to use the site, not because it's not a good service, but because it's one of those places where hours can go by without you even being aware of the passage of time. When it was selected by the American Association of School Librarians Best Websites for Teaching & Learning 2013 in June, I decided it was time to scrutinize Pinterest in earnest.  The AASL lists it under the category of Media Sharing, Standards for the 21st-Century Learner, 3.1.4 Use technology and other information tools to organize and display knowledge and understanding in ways that others can view, use and assess and 3.3.4 Create products that apply to authentic, real-world context.  


Pinterest is a free web 2.0 application for those 13 years and older allowing users to collect and post their favorite images, ideas, to a board.  Pinned items on other boards can be shared or repinned.  In addition to the Terms of Service and Privacy Policy, Pinterest has also posted an Acceptable Use Policy.  You can register using your Facebook account or by entering in your first and last name, email address, a password, country, and gender.  (Businesses need to create a different account.)

When you log in to Pinterest in the upper left-hand corner is a tiny icon with three lines which turns red when you mouse over it. If you select it, a menu drops down allowing you to search for pins in the general categories listed.  You can also enter in a keyword in the search term box. When you enter in a word(s) the results will show Pins, Boards and Pinners.  The first is those items about the word, the second is boards with the word in the title, and the third is those people with the word as part of their name.


Moving to the right on the top tool bar, by choosing the plus sign you can upload a pin from your computer by choosing a file, add a pin from a website by entering in a URL (you are reminded you can add a bookmarklet to your browser tool bar), or create a board. (I'll come back to that later.)  Clicking on your name is the means for managing your account.  You can go to your boards, your pins, your likes, find friends, follow boards, get help, alter your settings or log out.  The icon on the far right signifies any notifications you have received.


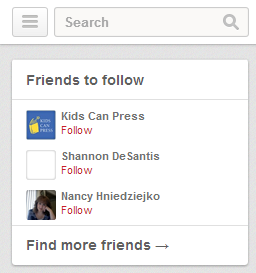
Upon accessing the home page by logging in, you will see suggestions for friends to follow underneath the search box on the left.  By selecting Find more friends,  you are taken to the boards of people you follow on Twitter or Facebook (if you have chosen those options).  You can invite people through their email address, Facebook, Google+, Gmail or Yahoo.  

Below these choices are pins, more pins and still more pins.  The amount of opportunities for pinning is nearly overwhelming.  I recommend setting a timer for browsing.  

Each time you mouse over an item, three small icons appear on the image at the top, pin it, send and a heart.  When you select pin it, another window appears.  You can choose to add it to an existing board or type in the name of a new board, creating it immediately.  When you have pinned it to a board, you can view it (1) or return to searching (2).


If you elect to See it now, the next screen (moving along the top from left to right) allows you to pin it again, like it, go to the website of the original image, send it using the same methods as looking for friends, or share it on Twitter, Facebook or by embedding it using HTML code.  On the right hand side you can go to your board to edit your pins.  If you scroll down further you can edit the original message on the pin (1) or leave a comment (2) as well as see who has repinned it (3).  You are also invited to see other boards which saved this and to view other images selected by those who pinned this item.  When you are finished with this window, click on the x in the upper right-hand corner.


Whether you choose pin it, send or the heart, if you click on an item using the tiny magnifying glass with the plus sign in the center (your mouse), the same options are available with the exception of your board being on the right.  The board on the right will be the board displaying the pin originally.


Clicking on create a board, opens up a new window.  You need to fill in a title for your board, a description, pick a category and decide whether you want to make it a secret board or open to the public.  A further explanation of secret boards can be found on another page.  Only those people you invite can see this board.  You can decide in the future to make it public but once you do, you can't change it back to secret.


After clicking on the red Create Board button a new page opens.  On this page you can choose to edit the board by changing the name, description, category, inviting people to pin by name or email or deleting it entirely.  If you select your name you are taken to your dashboard which displays your actions to date.

Newly created board


My dashboard

Again pins can be added by uploading files from your computer, using a URL hyperlink or from Pinterest. I discovered that Pinterest has a safeguard in place to protect users against spam.  I could only add 19 pins to my board at one time.  Here is a link to a board I started titled 2013 Picture Books Reviewed.


Pinterest is beneficial in several respects, enabling users to curate their own material separately, combining it with others or simply pinning everything from outside sources.  It's popularity and strengths are the ease of use, the access to multiple pins (an understatement to be sure) and the visual aspect of creating collections.  Another important feature is the ability to make your boards public or private.  I'm glad the AASL decided to select this website for their list.  

Wednesday, September 18, 2013

Trending Technology

In my lifetime the advances in technology are almost beyond belief.  I think I may have mentioned before, sometimes it's easy to feel like you might be living inside an episode of The Jetsons.  We've gone from rotary dial phones with party lines to smartphones, blackboards to interactive whiteboards, 16mm films to DVDs and records to CDs.  Audio and video can be accessed from the Internet and played on any number of devices.  Connectivity has never been higher.  The keys, in my opinion, are equal access and instruction in appropriate and meaningful use.

The American Association of School Librarians Best Websites for Teaching & Learning 2013 under the heading Content Resources, Standards for the 21st-Century Learner2.1.4 Use technology and other information tools to analyze and organize information, 2.4.4 Develop directions for future investigations and 3.1.2 Participate and collaborate as members of a social and intellectual network of learners selected a website noted for being a one-stop-shop for all things technology for students and teachers.  When first accessing the Edudemic website it's clear the committee's assessment was spot-on.  I decided to begin at the beginning or the top of the page.

Across the top, a tool bar offers:

  • Trends
  • How To
  • Updates
  • Tools
  • Social Media
  • News
  • Submit A Post
  • My Profile
  • Create Account and
  • Log In.  
Trends, How To, Updates, Tools, Social Media and News are separate web pages within the site.  Each is designed in the same manner as the home page.  At the top one article appears in a large box on the left, four others in smaller boxes to the right.  Underneath these are a list of other articles with the title, author's name, date posted and a short description.  This information is revealed in the top boxes with a mouse over.  At the bottom of all the pages are three columns of articles labeled, Recent Articles, Featured Articles and For Students.  


To Submit A Post you must be a registered user.  To register you enter in a username and email address.  A password is emailed to you.  Guidelines for writing a post are given at this page.


On the second tool bar left to right The Teacher's Guide is a portion of the site dedicated to providing guides easy to read, easy to use and easy to share.  Currently Edudemic has gathered links for The Teacher's Guide To:
  • Twitter
  • Flipped Classrooms
  • Copyright & Fair Use
  • Google Glass
  • Badges In Education
  • The Library of Congress
  • Keeping Students Safe Online
  • Choosing The Best Digital Content
  • Digital Scavenger Hunts and
  • Pinterest.
Underneath each guide is an explanation of the contents and an offer to add to the guide in the comments section.

Each guide is loaded with explanations, tips, charts, infographics, videos or links.   For example the guide to Pinterest contains headings such as:  a quick guide via an infographic, how teachers are using Pinterest, other ways to use Pinterest, inspiration, lessons, professional, fun, a student's guide, good boards to check out, education technology boards, home schoolers using Pinterest, social, resources, organization, final tips, education category, creating your own boards, providing reading lists and more resources, finding projects with materials, and student use for research.   These guides will provide educators with enough information to feel confident in using a specific technology.

Included in the tab, The Best EdTech, are suggestions for the best Education Apps (iOS), Education Apps (Android), Tablets For Education, and Laptops For Teachers.  They are listed in numerical order on Listly, curated by Jeff Dunn, with links for access.  Users are again invited to add possible items for each list.

Online Learning, Startups, Social Media and Tools are topics contained within the For Students section.  These pages are organized just like the home page.  All the articles have the same features.  Identical articles appear under the same subject headings in the student and teacher areas, making this site most valuable for upper middle plus students.

Several of the headings at the top of the website, How To, News, Social Media, Tools and Trends are listed in the For Teachers category.  Additions are Online Learning, Startups, and Videos.  You can also do a keyword search in the box to the right of this final tab.   

When opening up a specific article such as The 10 Most Popular Teacher Tools shown at the top of the home page, the title, author and date posted are seen at the top.  Directly underneath are icons for sharing this article on Twitter, Facebook, Google+, LinkedIn, Buffer and Pinterest.  This particular story lists the top sites and applications with a short description and links to each of them.  At the conclusion of an article are related items headings, links to the previous and next stories, you may also like articles and a comment section.  


If you're not careful you could stay at Edudemic for hours and hours.  There is so much information, valuable and timely, of benefit to educators and their students at all levels.  There is a box for entering in your email address so daily features can be sent to you.  This is a more than worthy additional to the AASL's Best Websites for Teaching & Learning 2013.

Wednesday, September 11, 2013

To Know, To Have Knowledge

Curiosity is a powerful word.  Wanting to know the what, who, why, when and where has been responsible for some amazing discoveries, inventions and understanding of otherwise unknowns.  It's mind-boggling to pause and wonder how different our world would be if not fueled by curiosity.


The American Association of School Librarians Best Websites for Teaching & Learning 2013 under the heading Content Resources, Standards for the 21st-Century Learner, 2.1.4 Use technology and other information tools to analyze and organize information, 2.4.4 Develop directions for future investigations and 3.1.2 Participate and collaborate as members of a social and intellectual network of learners selected a website which is a project of the Directorate for Education and Human Resources Programs of the American Association for the Advancement of Science, a part of Thinkfinity.  This website, Science NetLinks, is free to use, designed specifically for the K-12 educational community  and contains:

teaching tools, interactives, podcasts, and hands-on activities.

Across the top of the home page, a tool bar offers the following choices:


  • Books for the Science Classroom
  • Creating Classroom Rules
  • Spotlight on the Brain and
  • Curve Balls.
Moving left to right Books for the Science Classroom is a resource put together by Science Books & Films, a reviewing journal for the AAAS.  Only science trade books which have received a highly recommended rating are included.  This tool links to those reviews.  A blue launch tool button will take you to a new window so you may conduct a keyword search.

Beneath the launch tool button a drop-down box provides an explanation of other possible uses for the items listed in this resource.  In addition, it includes links to possible lessons using trade books.  Every time you access this page three different lessons will appear.  The possibilities are numerous.


Creating Classroom Rules is exactly what it says.  It is a very comprehensive lesson for setting the stage for learning.  It is divided into sections titled what you need, materials, purpose, context, planning ahead, motivation, development, assessment, extensions and related resources.

Spotlight on the Brain is part of a larger feature of the site.  Every day a sixty second podcast, Science Update, highlights news in science, technology or medicine.  This tool will take you to all those podcasts which, in some manner, have to do with the brain.  A transcript and the podcast are listed as choices.  As you can see below, more tie-ins to this tool are provided for educators.


The final option on the top toolbar, Curve Balls, is a sample of an individual Science Update page.  Following the podcast (1) and transcript (2) are several additional paragraphs for further discussion followed by possible questions to use.  As in the previous pages this contains a drop-down menu For Educators section.


Not having visited this website over a long period of time I am not sure if the items on this top tool bar change or if they are examples permanently in place to give users an overview of the site.  Moving down the page there are more options.  These are lessons, tools, collections, afterschool and science news tabs plus a search box for lessons and tools K-12.  


When you select lessons or tools an advanced but user friendly search screen appears as pictured below.  Beneath this are the most popular lessons and the most recent lessons used.  (On the tools page the most popular tools are listed as well as an explanation of what tools are: hands-on activities, interactives, teaching aids or websites.) Under grades, themes and content you can click any number of the boxes you desire to refine or enlarge your search. 


For this search I choose fifth grade astronomy lessons (1).  On the left-hand side I can filter the results (2) by type and intended audience.  The resources are listed by title with appropriate grade levels for use (3).


The Collections lists about twenty special groupings per page (1).  An explanation of what constitutes a collection is given on the right-hand side (2).  Each collection list is broken down by the specific item such as lessons, tools, science updates, videos, and other resources.


Offering many hands-on science activities the Afterschool page is a more casual approach.  When you choose a specific title, there will be an option for educators and for students.  The educator option gives you materials, background, activity instructions, and related activities.  The student option gives you an activity sheet and online resources.


The final tab on the far right, Science News, is similar to the home page.  Predominantly shown are three major boxes featuring a rotation of resources, a Science Update and Today in Science. You can select the Science Updates box to see all of them.  If you choose Today in Science there is a calendar where any date in the year can be viewed.


Each time a lesson, tool, collection or after school title is selected on the right a small black box appears titled ______Details.  Here you will see grades, themes, and type.  Added to these might be project 2061 benchmarks or state standards.  If you desire by clicking on grades, themes or type, you are taken back to the advanced search box page. 


Science NetLinks is an impressive website.  As I explored hour after hour, I found myself continually fascinated by the information presented as well as the value it would provide to students, staff and parents in any school district.  Navigation of the site was extremely easy giving users multiple means to access to the variety of sources.  I can't imagine a science educator not using this site to enhance classroom instruction.