Here is a battle report of the first game of Warlord's Bolt Action. The background of the game. Following the failed assault on the city of Leicester the Duke of Rutland's Royalists have fallen back, rapidly, to the defensive lines and Loyalist heartland around Melton Mowbray, Rutland and the Vale of Belvoir (pronounced Beaver). This meant the forces of the Socialist Council of Leicester took advantage of the chaotic situation and took back the lost village of Houghton on the Hill but stayed there as the support lines to the city could be threaten by Lord Quenby's forces from Quenby Hall. So the Council ordered forces to move out in the northerly direction to scout the area in and around Melton Mowbray looking for contact with the Dukes forces. Meanwhile the Duke's forces are patrolling the area around Melton Mowbray and at the village of Gaddesby the two forces bump into each other.
 |
| The map of the Gaddesby |
It was a cloudy overcast morning when a forward patrol of the Leicester City Socialist Council was scouting the area around the village of Gaddesby searching for supplies and the Duke of Rutland's forces bumped into the Duke's forces. The Duke's forces where already in the village and set up ready to meet the Socialists, taking up very good positions in and around the village and prepared themselves for the Socialist patrol. The Socialists led by the Humberstone Militia and regulars of the Leicestershire Regiment advanced toward the village and the Dukes forces placed within, confident in another victory for the Socialist cause and to give the Duke again bloody nose. The Dukes forces forces after the crushing defeat at the gates of Leicester though fighting on "home" ground with happy and confident that they could carry the day and to some way to avenge the defeat at Leicester.


Now the Leicester Socialist's came in from the west of the village across the farm fields after leaving there transport behind down the road and advanced towards Gaddesby on a board front with the Leicsestershire and a Armoured Car on the left flank and the Humberstone Militia taking the right and centre. But as soon as the Dukes force saw this the moved their assault section toward the Leicestershire with support for their Armoured Car and a veteran BUF militia in the centre and the Leciestershires soon fround the going very hard with casualties starting to mount to took the only sensible coarse of action of finding cover behind some hedges. In the meantime Humberstone Militia Command under Sir Maurice Levey-Paget MP, 2nd Baronet Humberstone, steward John Borrows, an ex Great War Veteran with loads of medals but no experience of modern warfare with Sir Maurice's son, Thomas and friends advanced to use the cover of the field walls and try and engage the Duke's centre and relieve some of the fire that was pouring down on the Leicestershire. The Village Section of the Humberstone Militia run to the hedges that lined the road in an attempt to get into the Duke's forces rear and threaten the Duke's artillery that was firing from there.
 |
| View from the Duke's lines of the Socialist advance |
 |
| The Duke's forces coming out to take of the Leicestershires. |
 |
| View of the Socialist's advance |
Soon the casualties really start to mount up for the Leicestershires forcing them to keep their heads down under such heavy firing the Socialist's Armoured Car doing very little to stop the volume of firing from the Dukes assault troops. Things where starting to bad for the Leicestershires and good for the Duke. In the meantime Thomas Paget's section and the steward, John Barrows, had managed to across the wall in the field and started to take up defensive positions to defend themselves from the Duke's chaps. In the meantime The Duke carried on shelling the Leicestershires and the Humberstone Militia, Village section started to cross the hedges and advance across the road.
 |
| The Leicestershire hiding behind the hedge with their heads well down |
 |
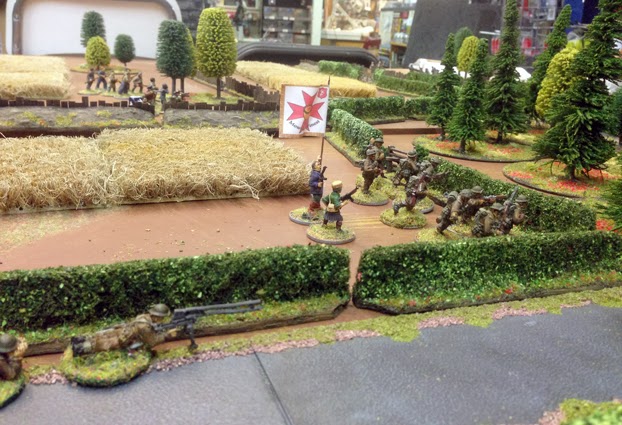
| Thomas Paget and friends with the John Borrows and the Humberstone Militia banner taking up positions in a enclosed field. |
 |
| The Duke of Rutland's glorious assault section pouring fire onto the Leicestershires |
 |
| The Duke's veteran BUF Militia opening firing on the Thomas Pagets men. |
 |
| The Duke's Rolls Royce Armoured Car opening firing on the Leicestershires. |
 |
| The Humberstone Militia Village Section advancing across the road |
Then the Duke's assault troops assaulting the Leicestershires and they took flight and run back to the transport and then the Duke's assault troops turned left to attack Thomas Paget's men with a short range firefight occurred aimed by the BUF Militia and the Armoured Car they too started to take casualties. Meanwhile the Humberstone Village section decided to run across the open ground to the cover of a wheat field but forgot the hedge that was in there way and managed only to move down the road a little.
 |
| The Duke's BUF Militia and Command firing on Thomas Pagets section. |
 |
| The Duke's assault troops preparing to attack the Leicestershires. |
 |
| The Duke's assault troops in a firefight with Thomas Paget's section |
 |
| The Duke's assault troops pouring firing on Thomas Paget's section |
But the Thomas Paget section being behind a wall and with support from the Socialist's Armoured Car cut to piecing the assault troops and started a heroic defence of the enclosed field but with the combined firing of the BUF Militia, the Duke's Armoured Car and the the Duke's artillery they slowly found their numbering reducing and then their broke and run leaving John Barrows and the banner man, the Armoured Car and the village section trying to fight the Duke's force off. The Village section tried to advance across a field to behind a farm cottage to get some cover, but where caught out in the open and where cut to pieces but they still stayed there under more fire was poured onto them when they too broke and ran. At this point fearing that the Humberstone Militias Colours where going to be captured John Borrows fun to safety of the vehicles and the Socialist's Armoured Car beaten a retreat. A Good Day for the Duke of Rutland's forces in checking an Socialist advance, holding the village of Gaddesby and making the Socialists think again.
 |
| BUF Militia pour heavy fire on the Socialists |
 |
| The Duke's Armoured Car opening fire on the Humberstone Militia Village Section |
 |
| The Socialists Militia's Armoured Car trying firing at the Duke's forces. |
 |
| John Borrows and the Humberstone Militias Colours in the thick on it just before running away |
 |
| All what was left of the Humberstone Militia, Village Section |
 |
| The Victorious Dukes Command |
It was a good game using Warlord's Bolt Action rules and Pappa Midnight extras and it was very enjoyable. It was the first time I played these and I have to say that they are a rather nice set of rules and give a good fun game. We actually played the Envelopment scenario from the book. Thanks Leics_Gamer for such a good game and well done on the victory, until next time, lol.