Yes indeed here is another gentleman for the club and this one is a preacher type. Armed with a bible and a saw off shotgun he plans to convert his way through the whole of the Empire of the Dead. Also I plan to use him with my VBCW Witchfinder General force i am creating. He is going to be the younger firebrand preaching brother to the Witchfinder General himself. He see it as his God given mission to save British to the excesses of the past two decades that have caused the downfall of the Motherland and the civil war. Together with his brother he has signed up with General Wynd-Gator to "save" Britain and bring an end to all this foolishness.
He is a lovely sculpted figure from the Artizan Designs Cowboy range and is was a real joy to paint. Here area couple of other pictures of him.
Showing posts with label VBCW. Show all posts
Sunday, December 15, 2013
Thursday, November 21, 2013
The Battle Of Carington Coppice, the Leicestershire Campaign Continues
Yes there has been more fighting in Leicestershire and here is the latest report.
Following the capture and defeat of the Duke of Rutlands forces at Ashby Folville by the Socialist Council of the City of Leicester, SCCL, the plan was to advance up the road to Carington Coppice to capture the important crossroads there where the SCCL forces could threaten all the Duke's assets and forces in the area. With this is mind the SCCL entrusted 2nd Lt Stan Cunningham, Leics Regt, to advance in a threatening manner to take and hold the vital crossroads and surrounding area.
However the Duke's forces played a blinder and totally out manoeuvred the LCCL forces as they got the to Coppice and crossroads by coming up behind them forcing the LCCL to take defensive positions at the crossroads and defend it from the Dukes forces. Now the lay of the land was a strong defensive position but the Dukes troops had good cover from the farm field and the crops in them. The Duke sent up his Armoured Cars up the road to cover and support the troops in the Walkers Crisp Van, and fanned out his other troops across the farm fields. The LCCL spread across the hedges and Coppice and placed they Armoured Car at the crossroad to reply any attacks and had the Post Office Rocket Rocket Battery place on the right flank to protect against any attacks from there.
Following the capture and defeat of the Duke of Rutlands forces at Ashby Folville by the Socialist Council of the City of Leicester, SCCL, the plan was to advance up the road to Carington Coppice to capture the important crossroads there where the SCCL forces could threaten all the Duke's assets and forces in the area. With this is mind the SCCL entrusted 2nd Lt Stan Cunningham, Leics Regt, to advance in a threatening manner to take and hold the vital crossroads and surrounding area.
The Dukes Armoured Cars Advance up the road firing on the LCCL's Armoured Car |
The Leicester Yeomanry lay hidden behind Carington Coppice |
The Duke's Assault troops come under fire from the Post Office Rocket Battery and they hit with there first round. |
The Leicestershire's take up defensive positions |
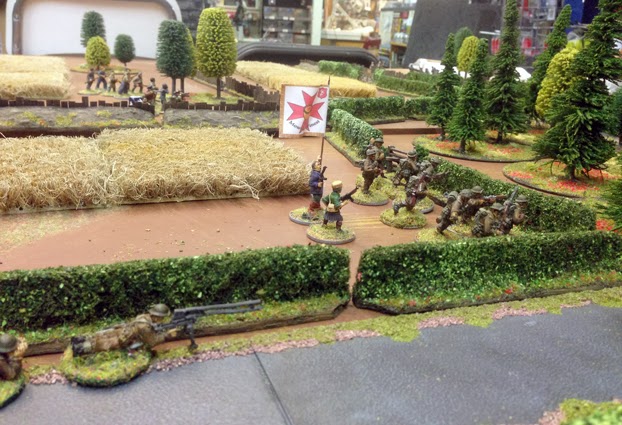
The Duke's forces advance on the Crossroads with their boys for the Leicestershire leading the way |
The Duke's Armoured Cars firing on the crossroads and the LCCL's Armoured Car |
As the Dukes forces advanced up the road towards the crossroads they managed to pinned the LCCL's Armoured Car causing to to be taken out of the action at the time and denying the LCCL with valuable support. But the LCCL put up a stiff defence proving fire onto the Duke's Armoured Cars to no effect and finally the Leicester Yeomanry charges the Armoured Cars taking out one of them before retreating back behind the coppice. Meanwhile the Duke's forces advance up towards the coppice and a line of fences coming under firing from the LCCL forces.
The Leicester Yeomanry attack the Duke's Armoured Cars |
The LCCL Leics pour fire onto the Walkers Van |
The Duke's Leicestershire advance to the coppice and they Boys A/T rifle fires at the Armoured Car |
The Leicester Yeomanry clearing the way |
The Duke's Assault troops coming under fire from the LCCL's Shoeworkers |
The Duke's Assault troops after taking heavy fire |
The Post Office Rocket Battery firing on the Dukes troops as they cross the farm fields |
The Duke's Leicestershires come out into the road to engage the defenders of the crossroads but find themselves in a crossfire from the Croydon Crusher and the LCCL's Leicestershires where fellow soldiers from the same regiment start firing upon each other for the first time, a sad moment in the regiment's history. The Dukes remaining Armoured Car, safe from LCCL fire engage the Leicester Yeomanry who have retreated to behind the coppice for cover and the Croydon Crusher comes under fire from the Duke's forces causing it to be pinned. The LCCL Leicestershires open fire into the Duke's Leicestershire causing them a number of casualties and the LCCL's Armoured Car fires at the Dukes Armoured Car but failed to cause any damage. Meanwhile the Duke's forces in the fields in the centre come under heavy fire for the PO Rocket Battery and a LCCL sniper starts to take its toll on the Dukes troops in the centre.
Now the Leicester Yeomanry charge once again in a "Death or Glory" charge, lances levelled in an attempt to take out the second of the Duke's Armoured cars and succeed in taking it out. With both the LCCLs and Duke's Leicestershires involved in a fierce firefight with each other until the Duke's Leicestershires break and leave the battlefield. With the weight of fire the LCCL pour on the Duke's centre, the Duke's Assault troops also break and leave the battlefield leaving the Duke's battled infantry to weather the LCCL's fire before they too retreat along with the Duke's command leaving the crossroads in the LCCL's hands.
Another good game using Bolt Action rules and with bigger forces, this time 750 pts. Starting to get the hang of the rules now and liking the system. Gosh cavalry is deadly.
The Duke's Leicestershires attack the crossroads |
The Dukes Armoured Car fires at the Leicester Yeomanry |
LCCL Leicesterhires fire at the Duke's Leicestershires, a sad moment in the regiment's history. |
LCCL's Armoured Car fires upon the Duke's Armoured Cars |
The Duke's infantry suffering for the effects of Rocket and sniper fire. |
The Duke's Assault troops pinned down in the field |
LCCL's Rocket and Sniper teams at work |
Leicester Yeomanry charge again and take out the second Armoured Car |
The LCCL's Leicestershires firefight with the Duke's Leicestershires |
The Duke's Command retreating from the battlefield |
The Shoeworkers forcing the Duke's Assault troops to break |
The Duke's Infantry in the centre coming under very heavy fire |
The LCCL's sniper and Post Office Rifles and Rocket team engaged in the centre |
Tuesday, October 29, 2013
Battle of Ashby Folville
After the defeat of the People's Army of Socialist City of Leicester by the Duke of Rutland and the capture of Gaddesby the city was coming under a new threat from the Dukes forces. The Duke moved toward the village of Ashby Folville in an attempt to both secure resources from the local area and cut the supply lines to Nottingham for the city. However, the Socialists Council reacted to this threat and gaining intelligence of the attempt to village of Ashby Folville they moved forces to counter the move and take the village for the city's aims. Again the Duke used his trusted men from Melton Mowbray, the troops who had just defeated the Socialists forces at the Battle of Gaddesby and the Socialist's sent troops for the Anchor Boot and Shoe Co-operative Society, the Humberstone Scout Troop and the Farm workers of the Humberstone Militia.
The Setup
So the Socialist forces developed from the city side rushing in to take advantage of the cover provided by the hedges and walls surrounding the village with the forces of the Duke slowly making there way in from the Melton side and developing into the village The objective for both sides was to capture and hold the church of St Mary's, a good omen for the chaps from Humberstone as their parish church is of the same name.
With the Duke's men taking up position in the Churchyard the Socialist's Shoeworkers section advanced in the farm house to take advantage of the cover and to open fire on the BUF. This was supported by the Humberstone Militia's Support MMG providing covering fire and aided by the Post Office Rocket Team. The Humberstone Scout Troop dished across hedge and road to take up new positions in the hedges of the church. In the meantime the Farmworker's Section opened fire on the Assault troops as they crossed the field to close the gap on them. The Dukes artillery started to rain down on the Socialists MMG with the Armoured Car also pouring fire onto them. Meanwhile the BUF section fired at the Shoeworkers in the farm building to little effect.
The BUF section found itself in the middle of the churchyard and fired upon the Shoeworkers in the Farm House who in turn left the Farm House and advanced into better positions along the churchyard hedges and caught the BUF section in the open. The Humberstone Scouts then crossed over the churchyard and into the church itself and poured more fore onto the BUF, but a lucky hit from the Post Office Rocket team saw the church yard turn into a graveyard for the BUF men. The Duke's assault men and ladies poured fire onto the Farmworkers section causing a number of casualties among them and the Duke's artillery blew the Socialists Vicker's team away.
The Shoeworkers section carried on firing into the BUF graveyard but still they stood until all of the laid dead and wounded in the graveyard. This left the Scouts in total control of the Church of St Marys' and took up defence positions and fired upon to no effect the Duke's Armoured Car who returned the favour. Now the Dukes Assault troops advanced out of their cover and destroyed the Farmworkers section and the Duke's artillery took out the Post Office Rocket team.
Now the Duke's assault troops gather to make an assault on the church in an attempt to take the objective and the Duke's armoured car fires upon the Shoeworkers causing casualties among them but with the Socialist command then the Shoeworkers steady their nerve and firing on the assault section with supporting fire from the scouts and the assault fails and the assault section falls back to Melton. Leaving only the Dukes Armoured Car and artillery left to give battle the armoured car carries on firing at the shoeworkers and the artillery starts shell the scouts in the church. The Scouts in turn fire at the Armoured Car hitting it in its weak side armour and cause the vehicle to be crew to be stunned. Seeing this the Dukes command decides the battle is lost and make their way back the Melton using the walls of the village for cover and the battle is over with a victory for the Socialists.
Again another good and enjoyable game with Leics_Gamer using the Bolt Action rules. We are getting into the rules now and finding them rather easy to use. The only thing I am not totally sure about and maybe you Bolt Action players might be able to help with is when shooting at a vehicle. Now the rules state that you have too have a Pen value to be able to damage a vehicle but if you are shooting on the side or rear you get a +1 or +2 bonus, so can rifles, LMGs and MMGs take out a Armoured Car?
The Setup
![]() |
The Humberstone Scout making good of the cover the hedges |
![]() |
The men of the Post office Rocket Team and the Humberstone Militia's Farmworkers Section also take advantage of the hedges |
![]() |
The Shoeworkers Section and MMG support of the Humberstone Militia look to secure the Farm House |
![]() |
The Assault troops of the Melton men move into position near the village. |
![]() |
The Dukes Armoured Car moves into the village itself |
![]() |
The Dukes BUF section moves into the church yard |
With the Duke's men taking up position in the Churchyard the Socialist's Shoeworkers section advanced in the farm house to take advantage of the cover and to open fire on the BUF. This was supported by the Humberstone Militia's Support MMG providing covering fire and aided by the Post Office Rocket Team. The Humberstone Scout Troop dished across hedge and road to take up new positions in the hedges of the church. In the meantime the Farmworker's Section opened fire on the Assault troops as they crossed the field to close the gap on them. The Dukes artillery started to rain down on the Socialists MMG with the Armoured Car also pouring fire onto them. Meanwhile the BUF section fired at the Shoeworkers in the farm building to little effect.
![]() |
Shoeworkers entering the Farm Cottage |
![]() |
Humberstone Scouts in the churchyard hedges |
![]() |
The Farmworkers Section firing on the Duke's Assault troops |
![]() |
Socialist Support coming under serious fire from the Duke's artillery and armoured car |
![]() |
The Duke's artillery firing |
![]() |
The Melton assault section taking advantage of the cover of the hedges |
![]() |
The Dukes Armoured Car and BUF section in the churchyard |
The BUF section found itself in the middle of the churchyard and fired upon the Shoeworkers in the Farm House who in turn left the Farm House and advanced into better positions along the churchyard hedges and caught the BUF section in the open. The Humberstone Scouts then crossed over the churchyard and into the church itself and poured more fore onto the BUF, but a lucky hit from the Post Office Rocket team saw the church yard turn into a graveyard for the BUF men. The Duke's assault men and ladies poured fire onto the Farmworkers section causing a number of casualties among them and the Duke's artillery blew the Socialists Vicker's team away.
![]() |
The BUF section in the church yard supported by the Armoured Car |
![]() |
The Shoeworkers section move into better positions and catch the BUF in the open. |
![]() |
The Humberstone Scouts take the church |
![]() |
The Melton Assault section pouring fire onto the Farmworkers |
![]() |
The Farmworkers taking casualties |
![]() |
Post Office Rocket team firing upon the Assault Troops. |
![]() |
Shoeworkers section finishes off the BUF section |
![]() |
The Scouts fire upon the the Duke's Armoured Car |
![]() |
The Duke's Assault section finishes off the Farmworkers |
![]() |
The Duke's artillery destroys the Post office Rocket team |
![]() |
The Melton command move into cover |
![]() |
The Socialist commander moves up to the churchyard hedge to aid with support |
Now the Duke's assault troops gather to make an assault on the church in an attempt to take the objective and the Duke's armoured car fires upon the Shoeworkers causing casualties among them but with the Socialist command then the Shoeworkers steady their nerve and firing on the assault section with supporting fire from the scouts and the assault fails and the assault section falls back to Melton. Leaving only the Dukes Armoured Car and artillery left to give battle the armoured car carries on firing at the shoeworkers and the artillery starts shell the scouts in the church. The Scouts in turn fire at the Armoured Car hitting it in its weak side armour and cause the vehicle to be crew to be stunned. Seeing this the Dukes command decides the battle is lost and make their way back the Melton using the walls of the village for cover and the battle is over with a victory for the Socialists.
![]() |
The Scouts fire upon the Dukes Assault troops |
![]() |
The Dukes Armoured Car firing upon the Shoeworkers |
![]() |
Socialist firing upon the Duke's Armoured Car |
![]() |
The Duke's Armoured Car with its crew stunned |
![]() |
The Heroes of the day the Humberstone Scout Troop |
![]() |
The Dukes command retreating back to Melton Mowbray |
![]() |
Victory for the Humberstone Scouts and the Socialists |
Again another good and enjoyable game with Leics_Gamer using the Bolt Action rules. We are getting into the rules now and finding them rather easy to use. The only thing I am not totally sure about and maybe you Bolt Action players might be able to help with is when shooting at a vehicle. Now the rules state that you have too have a Pen value to be able to damage a vehicle but if you are shooting on the side or rear you get a +1 or +2 bonus, so can rifles, LMGs and MMGs take out a Armoured Car?
Subscribe to:
Posts (Atom)