Showing posts with label creativity. Show all posts

Wednesday, December 4, 2013

Going Digital---A Magazine By Glossi

Nearly a year ago, Heather Moorefield, education librarian at Virginia Tech and current chair of the American Association of School Librarians Best Websites for Teaching & Learning, and Richard Byrne, educator, speaker, writer and blogger at Free Technology for Teachers, tweeted about an app in invitation-only beta.  I sent in a request and was granted access.  Today registration for Glossi is open.

I have been waiting for a project to present itself to me so I could try out Glossi.  Yesterday a member of my PLN asked for favorite Christmas read aloud books.  I now had an idea for designing a Glossi.

Glossi provides users with the means for creating digital magazines. To register you may use your Facebook account or supply a username, email address and password. Each time I am given this choice; I opt for the email sign-up rather than make my Facebook information readily available.  Glossi is for users over the age of 13.  If users are between the ages of 13 to 18, they ask for parental or guardian approval.


Before signing up or logging in, across the top of the home page, you can choose create a Glossi, add images, read about Glossi, its features, learn the basics, go to the blog for the latest news, access information released to the press and contact Glossi with a simple message.  There are links to Facebook, Twitter, Instagram and Pinterest as well as a box for searching in Glossi.  


When you have registered and logged in, the tool bar across the top will change slightly.  The featured, newest, and popular Glossies, which you can see on the home page, are now accessed by special tabs.  You can see Glossies by people you follow and view Glossies by one of twenty-one categories.  To begin click on one of two create Glossi buttons.


Your first screen allows you to add a title, create the title page, two other pages, add a page and the back of your magazine.  Along the top the smaller icons represent:

  • add text box to page
  • add image box to page
  • add video box to page
  • clone this page
  • toggle page guides
  • toggle two page view and 
  • ask for help.
You can edit any item on your page by double clicking the box.


When working with text, there are 18 fonts from which to choose, the font size can be altered, the text can be bold, in italics or underlined, forty text colors are offered, a background color for your text is a choice as is a dark transparent background.  You can insert or delete a link and show or hide the tool bar.  Margin alignment, numbered lists, bulleted lists, increasing or decreasing indentations, adding a scroll bar, line height and letter spacing are additional options when working with text.  Make sure all default type is erased before you make selections from the tool bar.  Don't forget to double click to make changes.


For my title page I used an image of my own but you can add images via a website URL or by searching Google.  Glossi also contains stock images, backgrounds, effects & textures, frames & borders, numbers & symbols, photos and speech bubbles.  If you want text on an image, make sure you place the image on the page first.  Images can be moved around on the page and resized.


When you wish to add pages you have eighteen templates from which to choose or you can design your own.  Images, text, animations, PDF files, videos from YouTube, Instagram and Vimeo and audio from SoundCloud can be included in your magazine.  As you continue to add pages do save frequently.  When your pages are completed, click on the publish button in the upper right-hand corner.

At the next window you are asked to fill in a title if you have not done so already.  At this time you can add a brief description to your work and select a category.  You can also choose to make your Glossi unlisted. (A URL is provided on this page.)  You need to click the publish button again.

The next screen gives you your sharing choices.  You can share on Facebook, Twitter, Tumblr, Google+ or Pinterest.  An HTML code is available.  My first Glossi, a magazine of some of my favorite Christmas read aloud titles is at the end of this post.


When you close the previous screen, this window shown below opens up.  Previous choices along with others are made available.  You can now get any links and flag items.  You can edit the Glossi, unpublish, view comments, see all your pages at a single glance, share and view it full screen.


If at any time you need extra help, click the tab on the right-hand side.  There is a template for you to fill in as shown here.  For me this is another plus to this application; the willingness to offer assistance above and beyond any tutorials.


When exploring an application new to me, two things are always of the utmost importance, ease of use and the finished results.  Glossi shines in both areas.  Manipulating the text, finding and adjusting images, previewing and switching the order of the pages could not have been easier.  I recommend placing Glossi in your virtual toolbox.


Wednesday, July 10, 2013

Turn Out A Treat

Last week I featured one of the new websites, Seriously Amazing, selected by the American Association of School Librarians, Best Websites for Teaching and Learning 2013 at their annual conference in Chicago on June 29, 2013.  Another of those, listed under the first category, Digital Storytelling, Standards for the 21st-Century Learner, 4.1.8 Use creative and artistic formats to express personal learning and 4.3.1 Participate in the social exchange of ideas, both electronically and in person, is FlipSnack.  This free site offers users the ability to make flipping books.

There is a separate page specifically designated for educators at the website.  In the Terms of service it is stated users must be 13 years old or have parent/guardian approval to use the provided services.  It is requested that they view the Terms of service prior to granting their permission.

At the educator page four examples are available for your viewing, giving you an idea of possible uses and the format of FlipSnack.  To start click on the blue button reading, Make a flipping book.  At the next screen you are asked to sign in using your Facebook, Twitter, Google or Yahoo account.  It is requested you use the same account every time you use FlipSnack.


I decided to create a separate account specific to this site which you can do by entering in your name, email address and a password.  You are sent an email immediately in order to validate the information you supplied.  Once you click on the link in the email, you are taken to the work
space.


Across the top is a toolbar offering a keyword search of created Flips, the creation of a new Flip, view your FlipSnack, your profile and logging out.  Search results can be ordered by relevance or date.  In your profile you can add a username (can not be changed), your location, a short description, website or blog URL, change email, password or delete your account, add a picture to your profile and link to your Facebook, Twitter, Goggle+, YouTube or Vimeo accounts.


Documents can be uploaded from your computer in jpg, jpeg or pdf format by browsing or dragged and dropped into the available space.  Items can also be imported by using a URL.  Document positions can be reordered by dragging them around after imported.  They are shown as thumbnails under the Add documents section.

Continue adding documents until you have included all the pages you desire. My documents I decided to add were all blog posts.  I copied and pasted them into Microsoft Word, saving them in pdf format.  I then selected the blue Next button in the upper-right hand corner of the page.

At the following screen (Customize) you can edit your documents which appear in a row across the top of the page, choose a template (Classic, Hardcover, Coil, Interactive, Simple) for your FlipSnack, preview your FlipSnack in widget or full screen, and pick from a variety of settings to adjust the physical appearance of your FlipSnack.  You can also go back to the Add Documents step.


During the course of choosing the settings you wish for your FlipSnack, each time you change them the "look" is altered in the preview section.  On the tool bar in the right-hand corner, you can zoom in and out on a single view, view the thumbnails on a single page, go forward and back using the arrows, remove the sound and exit full screen. The options for sharing are not operable at this point in the process.  When you are satisfied click the green Finish button.


Your finished FlipSnack is shown on the next screen with the choice to alter the name.  Beneath the book is a thumbnail for the first page, two edit options, and the delete choice.  For sharing there is a URL link to copy, a direct connection to Facebook, Twitter, or sending an email.  The FlipSnack can be embedded in a SnackWebsite, other websites or downloaded.  The final chart is for viewing statistics. (Note: When embedding your FlipSnack at no cost a watermark will show. )

Here is the FlipSnack I made for the Mock Caldecott unit this year.  I only included books which I have reviewed to date.  To view full screen click on the center.  The entire book can not be viewed unless I upgrade to premium.  Only 15 pages/pdf can be viewed free of charge.


Once you have the items you wish to include in your FlipSnack in the proper format, you could not ask for an easier application/website to use.  There is a nice selection of options for the "look" of your book plus you can always upload your own images.  It's also important that at any time editing can be done which is especially handy when working for the first time with FlipSnack.  I recommend without reservation the use of FlipSnack.

Wednesday, May 8, 2013

So You Have A Story To Tell

Richard Byrne, educator and blogger at Free Technology for Teachers, ran a post on March 18, 2013 highlighting a new digital presentation tool.  Within a month Kelly Tenkely, educator and blogger at iLearn Technology, posted about the merits of this new web 2.0 application.  When these two people praise an online service with potential in an educational setting, I'm excited to try it out.

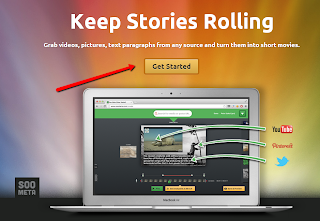
Soo Meta allows you to grab videos, pictures, text paragraphs from any source and turn then into short movies.  It is a free service with no restrictions on age in the terms and conditions of use or privacy policy but be sure to get permission from a parent or guardian for those students under 13 years of age prior to use. Simply click on the Get Started button to begin.

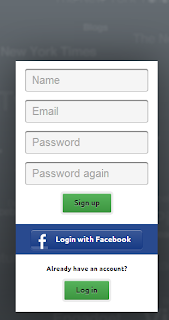
To register you need to enter in your name, email and password or you can use your Facebook account.  As soon as you select the Sign up button, a welcoming email is sent to you.  A new screen replaces the sign up requirements.


At this new screen you are asked to enter in a title for your new story.  You have three options: 
  • Build a story from scratch
  • Quick try: Load a Sample Story and
  • Blog teaser (RSS driven).  
Click Create.  


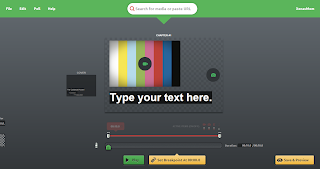
Your next screen is the building and editing area.  Across the top, left to right, are several options, File, Edit, Poll, Help and your name on the far right.  Under File you can do New, Open, Rename, Save Draft, Save Draft As... and Publish.  The choices within Edit are:  Undo/Redo (experimental), Insert New Chapter, Insert New Breakpoint, Items In Section (Video, Image, Text, Audio, Mix Up Items), Upload An Image, Get Collect Button, Delete Chapter, Delete Breakpoint, Set Background Image and Set Custom Highlight Color.  A New Poll can be easily added.  A Demo Video, Community Forum and Feedback are all found in the Help section.  You can access your Profile page, Upgrade/change your plan, Change Password and Logout by choosing your name.

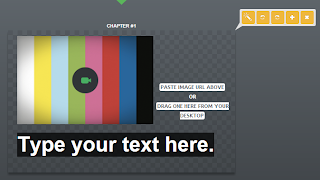
When you move your mouse over the checkered area you will be asked to paste in a URL for a video or an image plus some additional tools appear as small yellow icons.  They allow you to mix up frames, move the current chapter before or after another chapter, add a chapter and delete the chapter.  When you mouse over each of the yellow icons further explanations are provided.  


It should be noted that when a URL is added, the enter key needs to be pressed in order for the image or video to become part of the chapter.  As you work a gallery of your items appears in a column on the right side of your screen.  When you add chapters they are shown to the left and right of the chapter in which you are currently working, allowing for ease of movement in editing.

Using the arrows on slide bar located beneath the checkered area, you are able to trim the video to the exact section you wish to use.  Breakpoints can be set if you wish to change your text or images during a video.  Add chapters if you wish to insert new video or sound.  

When you mouse over the text you can decrease or increase its size.  The same is true for your image.  By clicking on your image you are able to drag it to the position you desire.

To record a voice over simply click on the miniature microphone to the left of the trim bar.  When you click Finish you will be asked if you want to expand the scene length to include your new audio or have the audio fade but keep the scene length the same.  If you are not happy with the recording simple delete the previous one and record again. 

The red arrow is pointing to further effects you can create.  You can choose to turn off or on/delete the video, image, text or audio.  This is very handy when you lack one of these items. 

When you have included all the items you wish to have in your story, click the Save & Preview button in the lower right-hand corner.  This will also give you a sharing URL and an HTML embed code. When you publish the story you have three options:  visible only to you, visible with a password and visible to everyone.

At the bottom of the preview screen are further choices.  You can set the volume, view the story in full screen, learn more about Soo Meta, like the story, follow the story, share it by embedding, on Twitter or Facebook or add a comment. When satisfied with your preview click Publish. (In order for the URL and HTML embed code to be updated you must publish first.)


Soo Meta is an outstanding digital storytelling tool.  With a minimum amount of time experimenting with all the available options, you can have a story (movie) created.  This would be an excellent tool for promoting a specific author, illustrator, genre or individual book.  This is my video on the 2013 Caldecott Medal and Honor winners.

Wednesday, April 10, 2013

Virtual Post-It Board-Mural.ly

In the summer of 2012 a new application premiere,  Mural.ly.  It was announced by Larry Ferlazzo initially in June at Larry Ferlazzo's Websites of the Day... and received a position on his The Best Web 2.0 Applications for Education in 2012.  More recently Kelly Tenkely posted about its potential uses in the classroom on her blog iLearn Technology.


Mural.ly states in their Terms of Use Agreement they area robust platform for visual collaboration and problem solving.  Murals ("Murals") are web pages that are like scrolling/zoomable whiteboards.

The site will have three options for accounts: free, premium and business.  It is not designed for children under the age of thirteen but in the Terms of Use Agreement they do say:

Accordingly, in order to use the Services, you must notify parents/guardians of the information to be collected from children under the age of 13 and obtain consent from the parent/guardian prior to collecting and sharing such information.

On the home page Mural.ly provides access to several sample Murals, collaboration ideas, testimonials from users and their blog for updates about the service.  To begin click on the bright pink Sign-up for free button.  You are asked to give your email address, a username and password.  You can use either your Facebook, Twitter or Google account to sign-up also.

Upon signing-up a new window appears, your Home page.  Across the top a bar designates possible actions, specifically in the right-hand corner. The first icon offers links to an FAQ, a list of keyboard shortcuts and anything someone new would need to know about the service.  Moving to the left, any notifications will be posted there.  The final icon is where your settings can be established and you logout.

When you select the plus sign in the center of the page a new window is superimposed on top of the work space.  You give your Mural a title, a place to be stored on the site and determine whether it will be private (indoor Mural) or public (outdoor Mural).  If it is private only those with granted permission can access the Mural.


Upon choosing Create Mural another window asks if you want to add people via email invitation to participate in the making of your Mural.  For the purpose of this post I skipped it.  A short one minute plus video comes on the screen next advising you how to DRAG AND DROP CONTENT SUPER FAST. 


When you close the video your work space appears.  In the upper left-hand corner a series of icons, left to right, take you home, allow you to export the Mural by sharing or embedding, invite people, change the Mural members or settings, and actions such as duplicate, move to... and archive.  The last icon on the left signifies that email notifications is on. 


Along the left-hand side of the work space is your tool bar.  From top to bottom you can add:

  • web content using a URL
  • images either by searching in Google images or uploading from your computer
  • documents from Google Drive
  • text in the form of titles, text boxes or sticky notes
  • shapes (9)
  • stickers, solid or full color, you can search by keyword for a specific item
  • spaces (9), templates for layout and
  • background (9).


In the lower right-hand corner and along the right side left to right, bottom to top you can:
  • comment
  • see the online users
  • view the Mural activity (all your current actions, comments and mentions)
  • chat
  • see your position on the Mural with the red rectangle
  • toggle to full screen mode
  • zoom in and out
  • move the screen left, right, top and bottom


When you select add web content the work space changes color giving you additional instructions.  After you add the URL, the item will appear below giving you a preview of how it will appear on the Mural.  Options appear around and inside the item when it is dragged to the Mural.   

You can change the title and the description of the web content.  The thumbnail can be changed or deleted.  You can add your own image if you like.  The entire box can be dragged to a new position, rotated, resized or you can:

  • add a comment
  • duplicate it
  • open the preview
  • lock it
  • bring it to the front
  • send it to the back 
  • edit it or
  • delete it.


At any time during your work on the Mural you can double-click on any spot to add text instantly. You can also frame specific areas of your Mural (click on the 1, 2, 3 circles on the bottom of the tool bar on the left) to direct viewers from one area to the next.  If you lock an item on your Mural right mouse click to unlock it as well as adding a comment,  open preview, bring to the front, and send to the back.

Upon completion of the Mural, go to the top and click on the Export button.  You can get a URL link or an HTML embed code.  Your entire Mural has a link and each individual item has its own link.


Mural.ly is an amazing new web 2.0 application with endless possibilities.  The results are sharp and clean but it is very easy to use.  I would highly recommend placing this in your virtual toolbox.
Here is a link to my Mural.ly about events during the month of April.  To activate any of the links simply double click.