Showing posts with label productivity. Show all posts

Wednesday, December 4, 2013

Going Digital---A Magazine By Glossi

Nearly a year ago, Heather Moorefield, education librarian at Virginia Tech and current chair of the American Association of School Librarians Best Websites for Teaching & Learning, and Richard Byrne, educator, speaker, writer and blogger at Free Technology for Teachers, tweeted about an app in invitation-only beta.  I sent in a request and was granted access.  Today registration for Glossi is open.

I have been waiting for a project to present itself to me so I could try out Glossi.  Yesterday a member of my PLN asked for favorite Christmas read aloud books.  I now had an idea for designing a Glossi.

Glossi provides users with the means for creating digital magazines. To register you may use your Facebook account or supply a username, email address and password. Each time I am given this choice; I opt for the email sign-up rather than make my Facebook information readily available.  Glossi is for users over the age of 13.  If users are between the ages of 13 to 18, they ask for parental or guardian approval.


Before signing up or logging in, across the top of the home page, you can choose create a Glossi, add images, read about Glossi, its features, learn the basics, go to the blog for the latest news, access information released to the press and contact Glossi with a simple message.  There are links to Facebook, Twitter, Instagram and Pinterest as well as a box for searching in Glossi.  


When you have registered and logged in, the tool bar across the top will change slightly.  The featured, newest, and popular Glossies, which you can see on the home page, are now accessed by special tabs.  You can see Glossies by people you follow and view Glossies by one of twenty-one categories.  To begin click on one of two create Glossi buttons.


Your first screen allows you to add a title, create the title page, two other pages, add a page and the back of your magazine.  Along the top the smaller icons represent:

  • add text box to page
  • add image box to page
  • add video box to page
  • clone this page
  • toggle page guides
  • toggle two page view and 
  • ask for help.
You can edit any item on your page by double clicking the box.


When working with text, there are 18 fonts from which to choose, the font size can be altered, the text can be bold, in italics or underlined, forty text colors are offered, a background color for your text is a choice as is a dark transparent background.  You can insert or delete a link and show or hide the tool bar.  Margin alignment, numbered lists, bulleted lists, increasing or decreasing indentations, adding a scroll bar, line height and letter spacing are additional options when working with text.  Make sure all default type is erased before you make selections from the tool bar.  Don't forget to double click to make changes.


For my title page I used an image of my own but you can add images via a website URL or by searching Google.  Glossi also contains stock images, backgrounds, effects & textures, frames & borders, numbers & symbols, photos and speech bubbles.  If you want text on an image, make sure you place the image on the page first.  Images can be moved around on the page and resized.


When you wish to add pages you have eighteen templates from which to choose or you can design your own.  Images, text, animations, PDF files, videos from YouTube, Instagram and Vimeo and audio from SoundCloud can be included in your magazine.  As you continue to add pages do save frequently.  When your pages are completed, click on the publish button in the upper right-hand corner.

At the next window you are asked to fill in a title if you have not done so already.  At this time you can add a brief description to your work and select a category.  You can also choose to make your Glossi unlisted. (A URL is provided on this page.)  You need to click the publish button again.

The next screen gives you your sharing choices.  You can share on Facebook, Twitter, Tumblr, Google+ or Pinterest.  An HTML code is available.  My first Glossi, a magazine of some of my favorite Christmas read aloud titles is at the end of this post.


When you close the previous screen, this window shown below opens up.  Previous choices along with others are made available.  You can now get any links and flag items.  You can edit the Glossi, unpublish, view comments, see all your pages at a single glance, share and view it full screen.


If at any time you need extra help, click the tab on the right-hand side.  There is a template for you to fill in as shown here.  For me this is another plus to this application; the willingness to offer assistance above and beyond any tutorials.


When exploring an application new to me, two things are always of the utmost importance, ease of use and the finished results.  Glossi shines in both areas.  Manipulating the text, finding and adjusting images, previewing and switching the order of the pages could not have been easier.  I recommend placing Glossi in your virtual toolbox.


Wednesday, August 14, 2013

The Ideal

In working through the excellent list compiled by the committee for the American Association of School Librarians for their annual Best Websites for Teaching & Learning 2013, the last selection under Curriculum Collaboration not yet reviewed here is 19Pencils.  This website addresses the following Standards for the 21st-Century Learner:


  • 1.3.4 Contribute to the exchange of ideas within a learning community
  • 3.1.2 Participate and collaborate as members of a social and intellectual network of learners
  • 3.1.4 Use technology and other information tools to organize and display knowledge and understanding in ways that others can view, use, and assess and
  • 4.3.1 Participate in the social exchange of ideas, both electronically and in person.
I have been wanting to explore this site ever since I read a review of it by Kelly Tenkely on her blog iLearn Technology

This free resource joins thousands of users worldwide in the sharing of educational support materials.  In accessing the home page front and center is a search bar.  Enter in keywords to see what content is available.  It's absolutely mind-boggling how many hits one receives.  For example when I entered in Caldecott there are 17,224 items listed.  This is certainly better than the 1,870,000 hits one receives using the same term when using Google.  


You can scroll through the first 20 results by moving the "dot" to the right shown by arrow 1.  In order to share (arrow 2) or add a resource to your class page (arrow 3) you must be logged in.


To create an account choose the Sign Up button in the upper right-hand section of the home page.  You need to enter in your first and last name, email address and a password.  You can also sign up using your Facebook account. 


Once you have an account and are signed in you can click the share icon on one of the results from your search.   This will to send an email with a short message and a link to the recipient.   When selecting the add to button you can place it in your favorites on your 19Pencils account dashboard or add it to your class page.


You can access your dashboard at any time by clicking on the My Dashboard button located in the upper right-hand corner of the web page.  At the My Dashboard page you have nine options from which to choose.  The first three are explained in the center section.


The Content tab allows you to search exactly as done on the home page, add a URL link to a website you already know (or add the Chrome extension to your tool bar for quickly adding websites to your class page when browsing), create and save a single hidden answer or multiple choice quiz which can be located on your class page and create games (this is a $3.00 a month subscription and is new to the site).


In the My Favorites section thumbnails of the saved items are shown.  These can be viewed, removed, edited (change the title of the item and its description) or added to your class page.  Quizzes and games can also be placed in this section.  


In order to best use the My School's Favorites you need to go to your account and make some changes.  You select your state, school district and building to view what others are using.  This is an excellent means of collaboration; keeping track of what others in your building are doing.

At the My Class Page section are thumbnails of your resources and a tab for quizzes you have created.  Your students can access an identical page via a unique URL as shown.  It is a secure way for them to see materials from any device with Internet.  


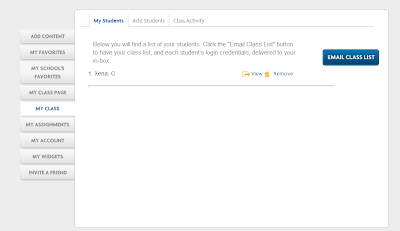
My Class is where each of your student names are added.  You enter in a first name and last name initial.  Each student will be assigned a password. (You see these by choosing Email Class List.) You are prompted to click OK to keep adding student names or go back to the My Students tab.  You can view the student's activity or delete them from the list.  The Class Activity tab reveals a graph of usage. 


Complete instructions on how to add assignments and notes are included with the My Assignments section.  My Account is where any changes to your password or other information can be maintained.  My Widgets allows you to copy and paste HTML code into your blog or website giving students and parents an easy link to the Class Page.  Invite a Friend gives you more than 350 ways to share 19Pencils with others.  

To see how it all works I decided to add some content.  When adding content by entering in a URL directly after choosing a title and description, it will go to your favorites.  By checking a box it will also go to your class page.  I added three items, a website and two PDF documents, two for students and one for teacher's only.

Here is a link to My Class Page.


This is yet another outstanding website selected by the AASL committee.  I give 19Pencils my highest recommendation for its depth and breadth of selections. To me the pluses, especially for elementary age students, are the secure environment, the ability for them to work at their own pace and being able to monitor the students' progress.  

Wednesday, July 10, 2013

Turn Out A Treat

Last week I featured one of the new websites, Seriously Amazing, selected by the American Association of School Librarians, Best Websites for Teaching and Learning 2013 at their annual conference in Chicago on June 29, 2013.  Another of those, listed under the first category, Digital Storytelling, Standards for the 21st-Century Learner, 4.1.8 Use creative and artistic formats to express personal learning and 4.3.1 Participate in the social exchange of ideas, both electronically and in person, is FlipSnack.  This free site offers users the ability to make flipping books.

There is a separate page specifically designated for educators at the website.  In the Terms of service it is stated users must be 13 years old or have parent/guardian approval to use the provided services.  It is requested that they view the Terms of service prior to granting their permission.

At the educator page four examples are available for your viewing, giving you an idea of possible uses and the format of FlipSnack.  To start click on the blue button reading, Make a flipping book.  At the next screen you are asked to sign in using your Facebook, Twitter, Google or Yahoo account.  It is requested you use the same account every time you use FlipSnack.


I decided to create a separate account specific to this site which you can do by entering in your name, email address and a password.  You are sent an email immediately in order to validate the information you supplied.  Once you click on the link in the email, you are taken to the work
space.


Across the top is a toolbar offering a keyword search of created Flips, the creation of a new Flip, view your FlipSnack, your profile and logging out.  Search results can be ordered by relevance or date.  In your profile you can add a username (can not be changed), your location, a short description, website or blog URL, change email, password or delete your account, add a picture to your profile and link to your Facebook, Twitter, Goggle+, YouTube or Vimeo accounts.


Documents can be uploaded from your computer in jpg, jpeg or pdf format by browsing or dragged and dropped into the available space.  Items can also be imported by using a URL.  Document positions can be reordered by dragging them around after imported.  They are shown as thumbnails under the Add documents section.

Continue adding documents until you have included all the pages you desire. My documents I decided to add were all blog posts.  I copied and pasted them into Microsoft Word, saving them in pdf format.  I then selected the blue Next button in the upper-right hand corner of the page.

At the following screen (Customize) you can edit your documents which appear in a row across the top of the page, choose a template (Classic, Hardcover, Coil, Interactive, Simple) for your FlipSnack, preview your FlipSnack in widget or full screen, and pick from a variety of settings to adjust the physical appearance of your FlipSnack.  You can also go back to the Add Documents step.


During the course of choosing the settings you wish for your FlipSnack, each time you change them the "look" is altered in the preview section.  On the tool bar in the right-hand corner, you can zoom in and out on a single view, view the thumbnails on a single page, go forward and back using the arrows, remove the sound and exit full screen. The options for sharing are not operable at this point in the process.  When you are satisfied click the green Finish button.


Your finished FlipSnack is shown on the next screen with the choice to alter the name.  Beneath the book is a thumbnail for the first page, two edit options, and the delete choice.  For sharing there is a URL link to copy, a direct connection to Facebook, Twitter, or sending an email.  The FlipSnack can be embedded in a SnackWebsite, other websites or downloaded.  The final chart is for viewing statistics. (Note: When embedding your FlipSnack at no cost a watermark will show. )

Here is the FlipSnack I made for the Mock Caldecott unit this year.  I only included books which I have reviewed to date.  To view full screen click on the center.  The entire book can not be viewed unless I upgrade to premium.  Only 15 pages/pdf can be viewed free of charge.


Once you have the items you wish to include in your FlipSnack in the proper format, you could not ask for an easier application/website to use.  There is a nice selection of options for the "look" of your book plus you can always upload your own images.  It's also important that at any time editing can be done which is especially handy when working for the first time with FlipSnack.  I recommend without reservation the use of FlipSnack.

Wednesday, June 19, 2013

Multi-Media Moments

It's the middle of the year and Larry Ferlazzo, educator and blogger at Larry Ferlazzo's Websites of the Day... has posted a list of his The Best Web 2.0 Applications for Education In 2013-So Far.  Of the thirty-two entries there are a variety, applications for a geography game and generating your own, using maps to document a trip, website creation, making presentations, writing, flashcards, video conferencing, royalty-free images, drawing, word processing, quiz making, designing quotations, adding speech bubbles to images and video annotation.  I selected a multi-media presentation tool called buncee to try.

Buncee was originally designed out of a desire by the Daniella Maria Arturi Foundation to have an online application to send a creative, interactive and personal message of thanks.  It's their goal to have buncee be the next generation of digital communication and content sharing.  Uploaded photographs and online images, text, drawings, video, and audio can be included in a buncee.

On the home page of buncee you can access (by clicking on tabs across the top) the About section (About, How To, buncee gallery, Mobile Apps, Follow buncee, In The News, Media Resources, buncee Team, Privacy, Terms and Contact Us), Categories (28 headings), Find Us (Facebook, Twitter, Tumblr, Pinterest, LinkedIn and their blog), a search box and a link to the Daniella Maria Arturi Foundation.  Many examples from assorted categories are shown; lots of ideas in which to use this service.  I decided to jump right in by clicking on the yellow Create your own button.

A new smaller screen appears allowing you to log in with a variety of social networks, your buncee account or sign up.  To sign up you need to give your first and last name, a user name, email address, password, birth date and gender.  You need to have read and agree to the Terms of Service and Privacy Policy.  Users do need to be 13 years of age.  A welcome email appears in your inbox immediately.

Along the top of the home page on the right your picture and first name now appears.  You can edit your profile (change picture, password, keep profile information public or private) keep track of interactions and logout.  It's now time to create.


Your buncee digital canvas is an easy-to-use workspace.
You can design one or more slides.  For each add a title.  For your background you can choose from the buncee possibilities, upload your own or simply select a plain color.


Images can be uploaded with a link attached.  When adding text an animation gives you hints on the screen while on the right are your choices.  Being able to add a link to your text is a plus.  To add a link you must highlight the text for that option to appear.


At any time if you wish to edit any item simply click on it.  You can edit, delete or rotate.  I would recommend periodically clicking the Save Draft button.  More slides can also be added from your digital canvas.

Messages and quotes are buncee generated in different fonts.  If you so desire you can insert a drawing or add themed stickers.  This has definite appeal if you are designing a specific message. (Education stickers have been included.)

To add other multi-media elements type in your keywords.  Click on the available icons, YouTube, SoundCloud, Flickr, Google and Instagram.  Thumbnails will appear in the results.  You can select any of them or type in a URL link. Click insert.  For ease in searching be sure to add tags.


When your buncee is completed click on the Next Step button.  You are taken to a window where you can place your buncee in a category, change the setting to public or private, and whether you want to allow comments or not.  Once completed, click Post. (You might want to click the Preview button in the upper right-hand corner first.)


At this final window you have many options.  If your buncee is an invitation you have the potential for RSVP.  You can enter in a list of email addresses and write a message.  Your buncee can be shared on Facebook, Twitter, Pinterest, Tumblr and embedded using HTML code.  And you can still go back to Create!

Here is the buncee I created after hearing the Kate Greenaway Medal announcement this morning.  


Within seconds of my posting I had a viewer comment.  On the left of your buncee are still more choices.  The ability to save the buncee slide on your computer and convert as a PDF file is a huge bonus.


Without a doubt I am glad Larry Ferlazzo included buncee on his new list.  This application is perfect for the educational setting.  It could be used to do visual booktalking, reader responses, mini-research, sending announcements and assignments to students.  The possibilities are only limited by your creativity.  This is definitely going in my virtual toolbox. 

Wednesday, June 12, 2013

Saving And Sharing The Web---Quickly

As I have frequently in the past I look to the "best" lists for new web 2.0 applications to explore each week.  In his The Best Web 2.0 Applications for Education in 2012 educator and blogger at Larry Ferlazzo's Websites of the Day..., Larry Ferlazzo lists a service for organizing, saving and sharing information discovered on the Internet.  This service could be compared to Dragdis (and other similar applications listed in that review).

Quicklinkr can be used without registration and is free.  There are no Terms of Service guidelines only a Privacy Policy.  When accessing the home page on the left is a column of choices. Each are self-explanatory.  The Tumblr provides you with updates to the service and suggestions for use.

Quicklinkr allows you to collect all types of information, websites, links, images, podcasts, and videos, on any device.  It is billed as being easy peasey, lemon squeezy.  I began by selecting the pink Get Started button in the center of the initial page.

A window pops up advising you cookies are used and asks you to review the Privacy Policy.  If you are satisfied click the Yes, Get Started Already! button.  On a new screen your initial Quickboard appears.  Anything with a URL can be added to your Quickboard.

On the left side you can choose to register this Quickboard and your folders are listed.  The first open (default) folder is Public.  At the top are two new small icons.  The first (on the left) allows you to change your grid size from small to medium to large.  The second provides for adding, renaming and deleting folders.  Registration is required for completing these actions.


To the far right of these icons is the space for adding a URL to create Quicklinks.  Beneath these choices a temporary URL link has been generated for this Quickboard.  As many Quicklinks as desired can be added.  For the purposes of making sub-folders, changing the Quickboard to private or making a custom URL, again, registration is necessary.


When clicking on the small down arrow located at the end of the temporary URL link, a drop down menu lists the options for sharing your Quickboard.  To add a Quicklink copy and paste or type in a URL, then click the Quicklink button. A thumbnail, snapshot, of the website will be visible in the grid.


When you mouse over the snapshot four small pink buttons are visible allowing for sharing of the individual Quicklink, adding a comment, changing the image (they will search for another one or you can add a URL link) or deleting the link.  You have to be registered to leave comments.  To register provide your first and last name, email address, a password and username.  A validation email will be sent with a code to enter in at the Quicklinkr website.  Once registered the Quicklinks can be ordered on the grid by date added, last viewed and most viewed. (The image on the right shows how this link can be shared.)


If registered, upon logging in you are taken to your profile page.  On the left you can toggle between home, user settings, logging out and noting folders.  The user settings are general settings (to stay logged in, allow anyone to add Quicklinks to your board and allow registered users to comment), profile (changing password), appearance (12 different wallpapers for the page) and tools (adding a bookmarklet to your browser toolbar for Quicklinkr).


With the American Library Association annual convention coming at the end of the month with the awards banquet, I decided to create a Quicklinkr to celebrate The One and Only Ivan by Katherine Applegate, the Newbery Medal winner for 2013.  Here is a snapshot of that grid and this is the link.


Quicklinkr is everything they claim to be and more.  My post is late this morning because I could not stop looking for items to add to my Quickboard; it's that easy to use.  Being able to create a board without registering would make this great for students under the age of 13 to incorporate into research.  All they would have to do is save the original URL link.  This application is definitely going into my virtual toolbox.  One more thing to note is the prompt response to email; it's fast and friendly.